Here are some answers to often asked support queries.
WordPress
Using Quick Edit and Bulk Edit to manage your posts in half the time
Click here to view a useful tutorial and video on showing you how to quick edit your posts or woocommerce products to save time.
WordPress has an easy system for creating and using menus but it is not always obvious how to work with the menu system.
In your WordPress menu choose Appearance | Menus. If you don’t see Menus then you might not have the rights to access the menu system so you will have to contact your administrator and ask them to give you the correct permissions.
Once you are in the Menu System you can select the menu you want to work with and add new items, delete old ones and even drag items to reorder them on the menu.
Here is a Video Tutorial that may be of assistance
Here is a link to the WordPress Codex User Guide on WordPress Menus: https://codex.wordpress.org/WordPress_Menu_User_Guide
This guide has details on creating a menu, adding items, deleting menu items and creating custom menus.
You can even create your own custom menus in WordPress
1. To create a custom WordPress menu, log in to your WordPress site and click to expand the Appearance menu on the left side of the WordPress Dashboard.
2. Click on the Menus link in Appearance menu. You’ll now be in the Menus editor page.
3. Enter your own custom menu name, and click Create menu.
4. Now you’re ready to add menu items from the boxes on the left hand side of the page, such as pages, categories and links.
5. When you have your menu items arranged in order, click Save Menu. You now have a new navigation menu that can be added to any menu location on your WordPress site.
You have to be logged into your WordPress Dashboard to do this. You can usually find your Dashboard by going to http://www.yourdomain.com/wp-admin/
- Hover over the Posts menu on the left-hand side menu. It will reveal the submenu.
- Click the Add New link.
- Now you’ll see the Add New Post page where you can create your first post.
- These are the deatails you can enter:
- Title: The first box is where you’ll want to enter the title of your post.
- Content: Next is the Post formatting section or post editor. This box is where you are going to type the content of your post. If you have written it already then you can paste it in here. You can also add image directly into the text by clicking the Add Media button.
- Publish: At the top of the right column on this screen you’ll see the Publish box. Here, your can save your post as a draft if you’d like to save it for later. If you click the Preview button, you can get a preview of how the post will look once it’s published.
- Status: The Status of the post will show if the post has been published, saved as a draft, if it’s pending review of if it’s been scheduled.
- Visibility: The next two links show the visibility of the post — or what visitors will be able to see your post. The Publish line shows whether the post will be published immediately or at a later date.
- Categories: The next section are for categories and tags assigned to your WordPress post.
- Featured Image: Add a featured image that will show whenever your blog is viewed in a list
Getting Help
If you ever need help while you’re on the Add New Posts page, just click the Help tab in the upper right corner. From here, you’ll be able to get a reminder for how to customize your post display, tips for adding a post title and using the post editor, inserting media and settings for publishing and discussion.
Video Tutorials on creating WordPress Blog
Here are some video tutorials that will give you a more visual tutorial
This tutorial is assuming that you are working off a pre-made layout of your page and will show you how to update modules.
The Divi Page builder is very easy to use but can be a bit overwhelming until you get your bearings.
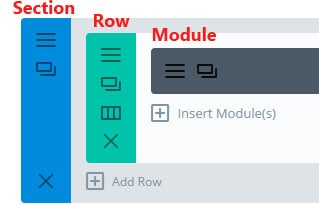
Page structure of a typical Divi page
Page Structure
Here is a basic overview of the page structure of a Divi page.
Pages are made up of:
Sections: in blue
Rows: in green
Module: in grey
Here is a quick tutorial on how to update a module (in the grey area). This will take you from the start.
Edit Page option in the top bar at the top of a page.
Step 1 – Editing a Page
Once you have logged into wordpress and you go back to your site you should see an Edit Page option (see image) at the top of the page in the WordPress bar. Click on this to take you into the page editor.
Click on the Edit option in the module you want to change.
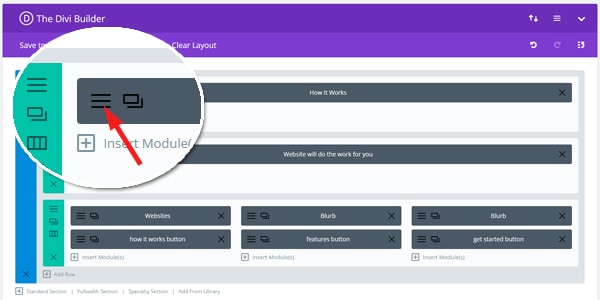
Step 2 – in the Divi Page Builder
You should now see the Divi Page builder with modules separated into Sections and Row. Click on the 3 horozontal lines at the left of the module you want to edit.
Make your changes and Save & Exit from the module settings.
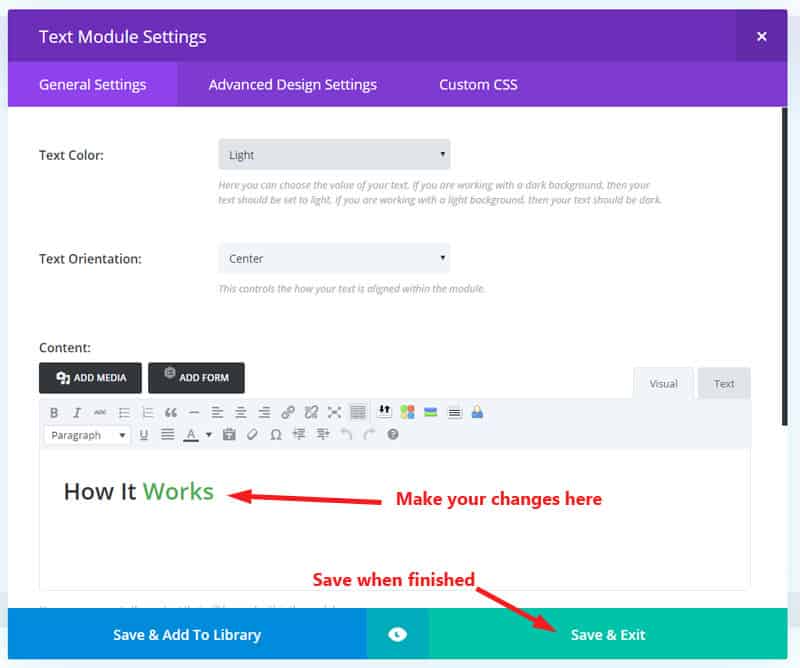
Step 3 – Editing and saving a module
Once you are in the module editor you can make you changes in the content area. It is the same as a normal wordpress content editor at this stage where you can add links, underline, bold etc.
Once you have completed that then Save & Exit

Remember to press the Blue Update button to keep all your divi module changes.
Step 4 – Saving your changes
Once you have completed your work in the various modules on a page then remember to update the page to keep your latest changes.
Press the Blue Update button on the right of the page
You can then view your page and you should see your latest updates.
Need Further Tutorials?
Divi Builder overiew: http://www.elegantthemes.com/gallery/divi/documentation/builder-overview/
Here is a list of other tutorials that may be of extra help: http://www.divithemeresources.com/divi-tutorial-sites/
Do you want to redirect a pdf to a page on your website but it is not working.
Sometimes a 301 Redirect on a pdf file will not work if the pdf file still exists. Delete or rename the pdf file and check again.
Redirection plugin in WordPress reports an “Expecting 301 but found 200” – “Agent: Not using Redirection” error.
If you don’t see an answer to your query then please Raise a Support Enquiry and I can help you