Here are some answers to often asked support queries.
Here is the information you need to setup your email if you host with Register365
Incoming mail settings
To collect your mail, you will need to enter the following details into your email program.
POP3 Incoming Mail Server: pop3.reg365.net (or pop3.{your-domain-name} once it has resolved correctly) for a POP3 mailbox
IMAP Incoming Mail Server: imap.reg365.net for an IMAP enabled mailbox
Username: {your-domain-name}_{username} for any mailboxes you have set up
Password: the current password for the mailbox you want to connect to
You can find a list of available mailboxes in your online Register365 Control Panel, under Domain Names > Email & FTP > Users and Email Rules in the Users and mailboxes section
If you want to be able to synchronise email between devices then enable the email address for IMAP and use the IMAP incoming mail server on both devices.
Outgoing mail settings
You need to have Authenticated SMTP service turned on for you account. Once you have that then you set the password for SMTP (please note this affects all your mailbox accounts)
SMTP Outgoing Server: server: smtp.reg365.net
username: {your-domain-name}
password: {your chosen password}
Register365 does not come with Authenticated SMTP as standard so if you don’t have an SMTP password then contact me and I can set that up.
If you need help configuring your email software for Register365 then this article may help.
If you email is with Blacknight then these are the settings you need:
Incoming Server:
IMAP: imap5r.cp.blacknight.com (or mail.blacknight.com)
POP3: pop33r.cp.blacknight.com (or mail.blacknight.com)
SMTP Outgoing Server: smtp1r.cp.blacknight.com (or mail.blacknight.com
username: your email address
password: your chosen password
For Blacknight e-mail accounts the username is the full e-mail address, the password is whatever was set up on the account when the mailbox was created and can be checked through ‘cp.blacknight.com‘.
Please make sure that SMTP authentication is enabled in the mail client as well. More details on how to switch SMTP authentication on can be found here
Setting up your Blacknight email in Outlook
Click here for more information
Setting up your Blacknight email on your iphone
Click here for more information
Setting up your Blacknight email on your Android device
Click here for more information
Checking your email through Webmail
This is a useful way to check your email without having to setup email software on your computer. You can access webmail for your blacknight email account with just your email address and password at the following address: https://altmail.blacknight.com/
Here is a good tutorial on how to setup an email on your android smartphone or tablet. Just substitute the relevant email settings:
Setting up email on android >>
Here is a good tutorial on how to setup an email on your iphone. Just substitute the relevant email settings:
If you have your email hosted with either Blacknight or Register365 you will be able to check your email on any browser as long as you know your password:
Blacknight
Go to https://altmail.blacknight.com
Register365
Go to http://yourdomain.com/webmail (replace yourdomain.com with your own domain name). Or if that doesn’t work then go to http://webmail4.register365.com/
Mail2Web
If none of the above work for you then you could try this 3rd party webmail checker. http://mail2web.com/
When you are unable to check your email for a period of time, for example when you are on holiday or at a conference it is a good idea to let people know. This can be done in the form of an auto responder or out of office email which is an automatic email that is setup in your email control panel.
Here are a few ways to do it, depending on the hosting you use:
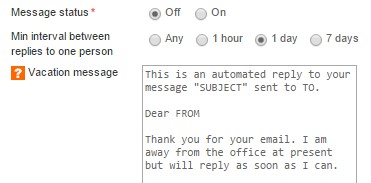 Setting up an autoresponder with Register365:
You will need your email username and password for this. Login to your email control panel (this can be found at http://your-domain/controlpanel – replace your-domain with your actual domain name).
Then choose email settings then autoresponder
You can then enter your autoreponder details
An autoresponder should include alternative contact information and information on when you will deal with their email
Setting up an autoresponder with Blacknight
Log into cp.blacknight.com using the email address and the password for your email address
Click on Autoresponder on the left hand side of the screen
Now click Add New Autoresponder
Remember to turn off your auto responder when you get back into the office.
Here are the details for configuring your Register365 email in your email software.
Configure your email software for a POP3 account
- Setup a POP3 account in Outlook 2003
- Setup a POP3 account in Outlook Express
- How to setup a POP3 account in Thunderbird
- Setup a POP3 account in Windows Mail
- Setup a POP3 account in Outlook 2007
- Setup a POP3 account in Mail for Mac
- Setup a POP3 account in Entourage
- Setup a POP3 account in Mozilla Thunderbird for Mac
- How to set up a POP3 account in Windows Mail 2011
- How to set up a POP3 account in Microsoft Outlook 2010
- How to set up a POP3 account in Mozilla Thunderbird
- How to set up a POP3 account in Mac Mail
- How to set up a POP3 account Outlook Express
- How to setup a POP3 account in Outlook 2007
- How to setup a POP3 account on iPhone/iPad/iPhone5
- How to set up an POP account on an Android device
- How to setup a POP3 account in Outlook 2013
Configure your email software for an IMAP account
- How to setup an IMAP account in Outlook 2007
- How to setup an IMAP account in Outlook 2010
- How to setup an IMAP account in Outlook 2013
- How to setup an IMAP account in Windows Mail 2011
- How to setup an IMAP account in Mac Mail
- How to setup an IMAP account in Outlook Express
- How to setup an IMAP account on iPhone/iPad
Check your email via Register365 webmail
Use this link for Register365’s webmail or
Email Control Panel
Use this link for your email control panel
If you need your email settings then this article may help.
There are a number of solutions for sending people large files and email is not one of the best as it is not really a file sharing system.
See this article for reasons why sending large attachment by email doesn’t work
Here are some alternate ways of sending large file attachments
- Dropbox – Share files across machines, with friends and publicly for free Dropbox is a utility that allows you to instantly share files between machines, and even with other users elsewhere on the internet. Up to 2GB is free.
- WeTransfer – an online file-transferring platform where you give them your intended email recipient and your email, upload the file and the rest is history. This is my preferred solution and something I use a lot as it makes it so easy for the person receiving the file.
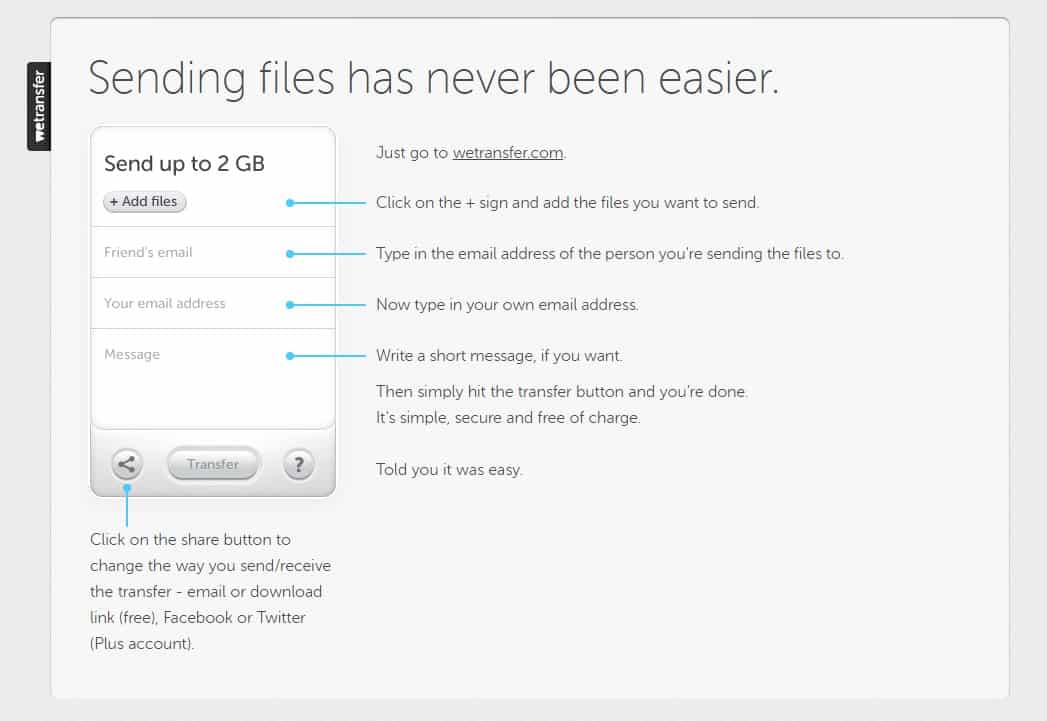
Wetransfer – a useful diagram showing you how to use their service for file transfers
Sometimes you may be asked to provide the internet headers or email message headers to your email hosts so that support can troubleshoot any problems.
Email message headers provide a list of technical details about the message, such as who sent it, what software was used, and the route it took. This information can provide valuable details on tracking an email source and how to it got to you, or why it never arrived at its intended source.
Here are details on how to get that information from different email software
Your email client program will usually hide the full header or display only lines, such as From, To, Date, and Subject, see below for more information on pulling headers for your email client:
- Outlook 2003
- Outlook 2007
- Outlook 2010
- Outlook Express
- Outlook 97
- Outlook 98
- Outlook 2000
- Outlook 2002
- Microsoft Exchange
- Zimbra
- Entourage
- Mac OS X Mail
- Outlook Express for Macintosh
- Gmail (works for Google Apps as well)
- Yahoo!
- AOL
- Hotmail
- Eudora
- Netscape, Mozilla or Thunderbird
- Lotus Notes
- Pine
- XtraMail
- Pegasus Mail
- Claris Emailer
- Mail Warrior
- Juno
- Novell Groupwise
- Thunderbird
If you want you can then analyze the header information using this tool from MXToolbox
WordPress
Using Quick Edit and Bulk Edit to manage your posts in half the time
Click here to view a useful tutorial and video on showing you how to quick edit your posts or woocommerce products to save time.
WordPress has an easy system for creating and using menus but it is not always obvious how to work with the menu system.
In your WordPress menu choose Appearance | Menus. If you don’t see Menus then you might not have the rights to access the menu system so you will have to contact your administrator and ask them to give you the correct permissions.
Once you are in the Menu System you can select the menu you want to work with and add new items, delete old ones and even drag items to reorder them on the menu.
Here is a Video Tutorial that may be of assistance
Here is a link to the WordPress Codex User Guide on WordPress Menus: https://codex.wordpress.org/WordPress_Menu_User_Guide
This guide has details on creating a menu, adding items, deleting menu items and creating custom menus.
You can even create your own custom menus in WordPress
1. To create a custom WordPress menu, log in to your WordPress site and click to expand the Appearance menu on the left side of the WordPress Dashboard.
2. Click on the Menus link in Appearance menu. You’ll now be in the Menus editor page.
3. Enter your own custom menu name, and click Create menu.
4. Now you’re ready to add menu items from the boxes on the left hand side of the page, such as pages, categories and links.
5. When you have your menu items arranged in order, click Save Menu. You now have a new navigation menu that can be added to any menu location on your WordPress site.
You have to be logged into your WordPress Dashboard to do this. You can usually find your Dashboard by going to http://www.yourdomain.com/wp-admin/
- Hover over the Posts menu on the left-hand side menu. It will reveal the submenu.
- Click the Add New link.
- Now you’ll see the Add New Post page where you can create your first post.
- These are the deatails you can enter:
- Title: The first box is where you’ll want to enter the title of your post.
- Content: Next is the Post formatting section or post editor. This box is where you are going to type the content of your post. If you have written it already then you can paste it in here. You can also add image directly into the text by clicking the Add Media button.
- Publish: At the top of the right column on this screen you’ll see the Publish box. Here, your can save your post as a draft if you’d like to save it for later. If you click the Preview button, you can get a preview of how the post will look once it’s published.
- Status: The Status of the post will show if the post has been published, saved as a draft, if it’s pending review of if it’s been scheduled.
- Visibility: The next two links show the visibility of the post — or what visitors will be able to see your post. The Publish line shows whether the post will be published immediately or at a later date.
- Categories: The next section are for categories and tags assigned to your WordPress post.
- Featured Image: Add a featured image that will show whenever your blog is viewed in a list
Getting Help
If you ever need help while you’re on the Add New Posts page, just click the Help tab in the upper right corner. From here, you’ll be able to get a reminder for how to customize your post display, tips for adding a post title and using the post editor, inserting media and settings for publishing and discussion.
Video Tutorials on creating WordPress Blog
Here are some video tutorials that will give you a more visual tutorial
This tutorial is assuming that you are working off a pre-made layout of your page and will show you how to update modules.
The Divi Page builder is very easy to use but can be a bit overwhelming until you get your bearings.
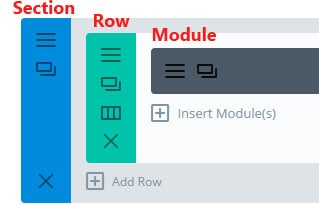
Page structure of a typical Divi page
Page Structure
Here is a basic overview of the page structure of a Divi page.
Pages are made up of:
Sections: in blue
Rows: in green
Module: in grey
Here is a quick tutorial on how to update a module (in the grey area). This will take you from the start.
Edit Page option in the top bar at the top of a page.
Step 1 – Editing a Page
Once you have logged into wordpress and you go back to your site you should see an Edit Page option (see image) at the top of the page in the WordPress bar. Click on this to take you into the page editor.
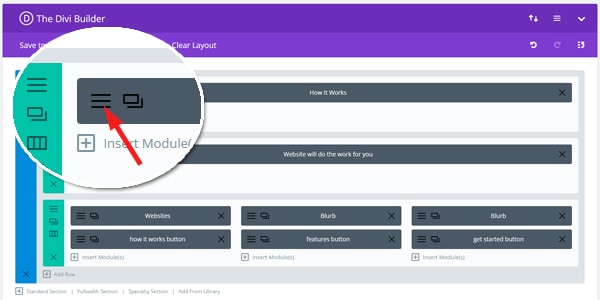
Click on the Edit option in the module you want to change.
Step 2 – in the Divi Page Builder
You should now see the Divi Page builder with modules separated into Sections and Row. Click on the 3 horozontal lines at the left of the module you want to edit.
Make your changes and Save & Exit from the module settings.
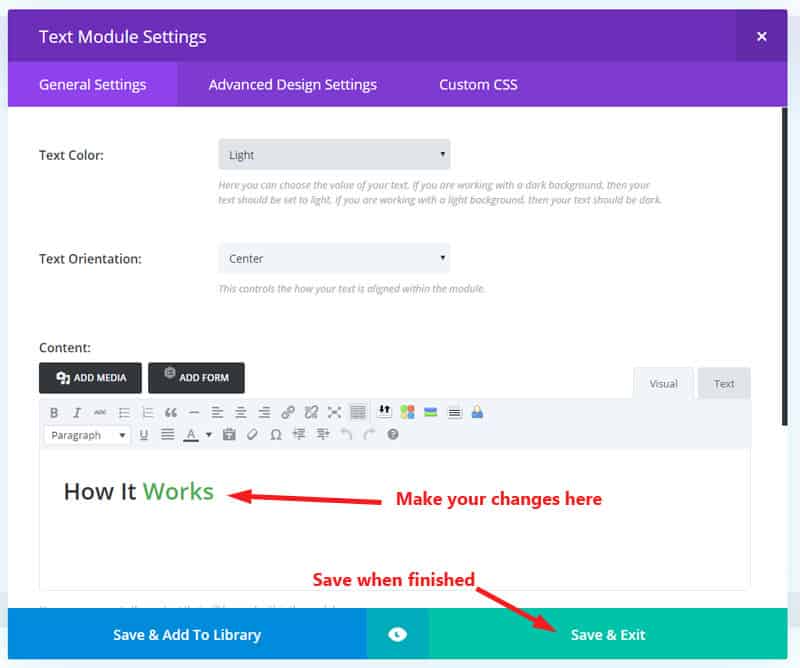
Step 3 – Editing and saving a module
Once you are in the module editor you can make you changes in the content area. It is the same as a normal wordpress content editor at this stage where you can add links, underline, bold etc.
Once you have completed that then Save & Exit

Remember to press the Blue Update button to keep all your divi module changes.
Step 4 – Saving your changes
Once you have completed your work in the various modules on a page then remember to update the page to keep your latest changes.
Press the Blue Update button on the right of the page
You can then view your page and you should see your latest updates.
Need Further Tutorials?
Divi Builder overiew: http://www.elegantthemes.com/gallery/divi/documentation/builder-overview/
Here is a list of other tutorials that may be of extra help: http://www.divithemeresources.com/divi-tutorial-sites/
Do you want to redirect a pdf to a page on your website but it is not working.
Sometimes a 301 Redirect on a pdf file will not work if the pdf file still exists. Delete or rename the pdf file and check again.
Redirection plugin in WordPress reports an “Expecting 301 but found 200” – “Agent: Not using Redirection” error.
General
If the program you are working on does not have an option to save as pdf then here are a few options that might help:
Install a simple pdf printer option
Use a simple little utility: Bullzip PDF Printer that creates a pdf printer that you can print to from any program.
You can download this program here: http://www.bullzip.com/products/pdf/info.php
When installed it will add another printer called Bullzip. In your program that has the document (or picture) choose print and select the the Bullzip printer. It will then give you options to save as pdf.
Use a free online pdf convertor
You can also upload your file to an online convertor that will convert it for you to download.
One such example is https://www.freepdfconvert.com/ which also gives you other format options like jpg and tiff.
Use Google Drive to download as pdf
If you are a Google Drive user then you can upload your document to Google Drive. Then when viewing it you can choose to Download as PDF.
Download the document as a PDF. Click File → Download as → PDF Document (.pdf). Depending on your browser settings, the download may begin immediately or you may be prompted to choose a download location.
PDF Files Meet Legal Document Requirements
Because a PDF document is a “read only” document that cannot be altered without leaving an electronic footprint
Modifying your hosts file allows you to override the DNS for a domain, on that particular machine. This is useful when you want to test your site without updating your domain to the new site yet.
You will be given an IP address and the domain name to add to your hosts files. Usually in this format:
54.39.229.198 www.domain.com
54.39.229.198 domain.com
These 2 lines with your new ip address and domain is what you will be entering into your hosts file.
Here are the instructions based on the various operating systems
Windows 10
- Press the Windows key.
- Click the Search icon
- Type Notepad in the search field.
- In the search results, right-click Notepad and select Run as administrator.
- In Notepad, open the following file: c:\Windows\System32\Drivers\etc\hosts
- Make the necessary changes to the file.
- Click File > Save to save your changes.
For Windows 8
- Press the Windows key.
- Type Notepad in the search field.
- In the search results, right-click Notepad and select Run as administrator.
- In Notepad, open the following file: c:\Windows\System32\Drivers\etc\hosts
- Make the necessary changes to the file.
- Click File > Save to save your changes.
For Windows 7
- Click Start > All Programs > Accessories.
- Right-click Notepad and select Run as administrator.
- Click Continue on the Windows needs your permission UAC window.
- When Notepad opens, click File > Open.
- In the File name field, type C:\Windows\System32\Drivers\etc\hosts.
- Click Open.
- Make the necessary changes to the file.
- Click File > Save to save your changes.
Mac OS X 10.0 through 10.1.5
- Open /Applications/Utilities/NetInfo Manager.
- To allow editing of the NetInfo database, click the padlock in the lower-left corner of the window.
- Enter your domain user password and click OK.
- In the second column of the browser view, select the node named machines.You will see entries for
-DHCP-,broadcasthost, andlocalhostin the third column. - In the third column, select
localhost. - From the Edit menu, select Duplicate. (The quickest way to create a new entry is to duplicate an existing one.)A confirmation alert appears.
- Click Duplicate.A new entry called localhost copy appears, and its properties are shown below the browser view.
- Double-click the value of the
ip_addressproperty and enter the IP address of the other computer. - Double-click the value of the
nameproperty and enter the hostname you want for the other computer. - Click the
servesproperty and select Delete from the Edit menu. - From the File menu, select Save.A confirmation alert appears.
- Click Update this copy.
- Repeat steps 6 through 12 for each additional host entry that you want to add.
- From the NetInfo Manager menu, select Quit.You do not need to restart the computer.
Mac OS X 10.6 – 10.10
- Open Applications > Utilities > Terminal.
- Open the hosts file by typing the following line in the terminal window:
sudo nano /private/etc/hosts - Type your domain user password when prompted.
- Edit the hosts file.The file contains some comments (lines starting with the # symbol), and some default hostname mappings (for example, 127.0.0.1 – local host). Add your new mappings after the default mappings.
- Save the hosts file by pressing Control+x and answering y.
- Make your changes take effect by flushing the DNS cache with the following command:
dscacheutil -flushcache
The new mappings should now take effect.
Recently a few clients found that excel files that were dynamically created online and being downloaded to Microsoft Excel 2015 were opening blank.

I tried to change the content type on the download and also change file extension to xlsx form xls but neither worked
Trust Issue in Microsoft Excel
It looked like the file was actually blank but it is actually a trust issue in Microsoft and we were able to get around it by doing the following:
- Open Excel Go to File Options
- Click Trust Center -> Trust Center Settings
- Go to Protected View. there are 3 options that show that were all clicked. Uncheck the first option that reads — “Enable Protected View for files originating from the Internet”.
In some cases both the 1st and 2nd options need to be unchecked
I had originally thought that I was going to have to rescript the downloads from Excel version to csv but thankfully the above worked.
Sometimes you might be asked to clear your browser cache to correct an issue or view the latest page of a website.
Why Clear your Cache?
Each browser keeps a copy each website page as you visit it. It then gives you this page then next time you visit that site to speed up your browsing experience. It then periodically gets the last version of that page but there are times you need to force it to get the latest version without waitng. That is when you need to clear your cache.
How to clear your cache in your browser
Clearing the cache is different for each browser, but practically all of them have a cache clearing option in their options or settings. Here are some instructions for the main browsers:
Chrome:
- Settings (three dots)
- More Tools
- Clear Browsing Data
Firefox:
- Menu (hamburger)
- Options
- Advanced
- Network
- Cached Web Content
- Clear Now
Safari:
- Options
- Reset Safari
- Remove All Website Data
Edge:
- Options (three dots)
- Settings
- Clear Browsing Data
See http://packard-bell-scandic.custhelp.com/app/answers/detail/a_id/38047/~/microsoft-edge%3A-how-to-clear-browser-history-and-cache for more information on MS Edge
Or try Refreshing the page
If you only want to load a page bypassing cache then simply refresh the page. The page will reload without using the cached files. Please note: This doesn’t clear the browser cache. You can do this with a soft refresh or a hard refresh.
Soft Refresh
If you click on the refresh/reload button or press the F5 or Ctrl+R hotkey on your web browser, this will trigger a “soft refresh” on the web browser where it will check against the web server to see if the files are modified. If modified, the web browser will pull the latest version of the file and if not modified, the web browser will continue to use the cache version.
Read More: https://www.raymond.cc/blog/refresh-webpage-with-soft-or-hard-reload-in-web-browsers/
Hard Refresh
As for hard refresh, it is a method to force the web browser to fetch all of the files again ignoring the expiration time and bypassing the local cache.
Read More: https://www.raymond.cc/blog/refresh-webpage-with-soft-or-hard-reload-in-web-browsers/
Soft refresh webpage: Click on the Reload/Refresh button or press the F5 key (PC) or Command+R (Mac) on keyboard.
Hard refresh webpage: press the Ctrl+F5 key (PC) or Command+Shift+R (Mac) on keyboard.
If you don’t see an answer to your query then please Raise a Support Enquiry and I can help you